Basics of Playing - Articulation
What are the basic flute playing skills that I need to master?
Part 3 – Articulation
Over the past several months, I have discussed the importance of good tone and technique several times. That is because those skills are the ones that will take you from the bottom half of your flute section into the top half. Precise articulation, performed clearly and with musicality, is a skill that can take you to the very top of your section.
We all start out learning about slurs and staccatos in our first year of band. That extends into tenutos, accents and combined slurs and staccatos over the next few years.
Ok, if it is something that we all learn, and all know how to do, why does articulation make that big of a difference? When it comes right down to it, good articulation can be one of the most versatile tools in your musical arsenal.
Think about it – if you have a performer who plays the same style of staccato notes in Beethoven as they play in Ravel or in Bartok, it will reveal that they do not understand how articulation can contribute to making their playing more musical, not to mention how to make the music sound more like the composer intended.
A good place to begin is to think about short notes. How short is short? If you have a staccato marking above a quarter note, does that automatically mean that you should play it as an eighth note followed by an eighth note rest?
In theory, the answer is yes. That is how we learn to define staccato notes. In reality . . . no way. Some composers write in a staccato marking, and it means that the notes are just barely separated. Others want to hear notes that are as short as possible.
One way to prepare for this is to learn ways to play short notes of many different lengths. Then you can be prepared to adapt to whatever the composer or conductor asks of you.
Let's begin with a simple rising pattern:
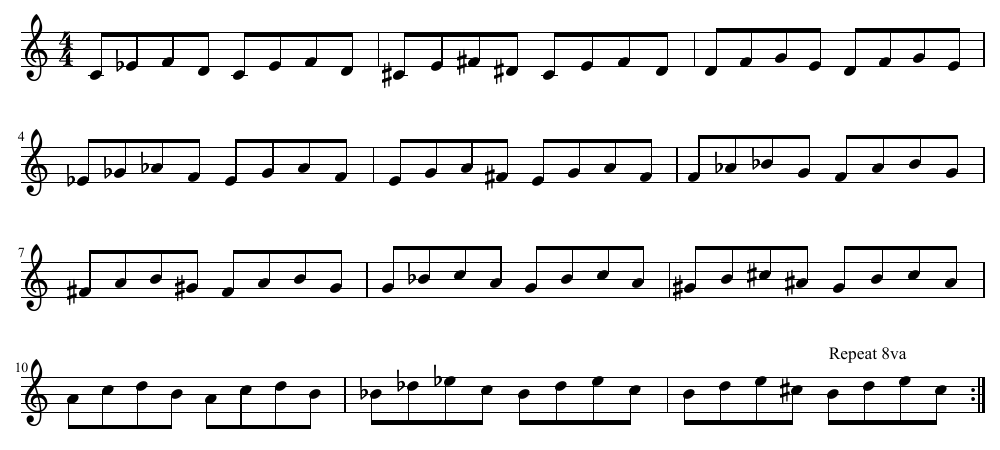
The first time through, I want you to tongue every note, but leave absolutely no space between each of the notes. You should be using almost as much air as if you were slurring for the same number of beats.
In the low range, you will want to use an articulation style that sounds something like “toe-toe-toe” or “doe-doe-doe” to make sure that there is more actual tone sounding, rather than the sound of your tonguing. As you climb into the upper register, be sure that your tonguing becomes very light, and that you are still connecting all of your notes. It tends to be easier to allow the air to stop between notes in the top register. You will need to use solid air support throughout.
On your second time through the above exercise, I want you to put space between each of the notes. It should sound as if it were written like you see below:

The key to playing the above pattern correctly is to make sure that you are NOT stopping the air with your tongue when you are pausing between each note. Sometimes it is difficult to tell whether or not you are stopping the air with your tongue or with your airstream, so we will try something different that we never do at any other time.
We are going to play through the main exercise once more. I want you to play it WITH spaces, but WITHOUT tonguing any of the notes. The best way to describe this action is to say that you are going to feel like an owl. You will be playing “hoo, hoo, hoo, hoo” (with one “hoo” per 8th note). You may not have played this way since you first picked up the flute as a beginner. It will feel very odd – that's ok!! The beginning and end of each note will sound less distinct, but make sure that the body of the note is still of a good quality sound. If you still hear a distinct cutoff to each note, be sure that you are keeping your throat open the entire time.
When you first begin playing without tonguing, it is likely that your abdominal muscles will get tired. That is ok, too! What it means is that you need to practice this exercise without tonguing until you are able to get through the entire thing. We are building up the same muscles that we all use when we get sick and are coughing constantly. Your stomach gets sore then, for a few days, right?
Once you play through all the way without tonguing, go to the top and add back in your tonguing at the front of each note. Be SURE that you are not cutting off the notes with your tongue, but stopping them with your airstream (just as you did when you were playing like an owl).
At this point, it is a simple matter of repeating this exercise (or any passage that contains repeating notes that are all tongued) while altering the length of your notes and the spaces between the notes. Now that you have mastered the skill of stopping the notes with your airstream rather than your tongue, variations on the length of notes are limited only by your willingness to learn them. Conductors and composers will be thrilled with your new versatility!
Not only will this skill help make your short notes sound better, but you will be able to cut off long notes in a much more delicate manner than many performers. Just concentrate on ending the note without using your tongue or the back of your throat, but just stopping your airstream with your abdominal muscles.
Part 3 – Articulation
Over the past several months, I have discussed the importance of good tone and technique several times. That is because those skills are the ones that will take you from the bottom half of your flute section into the top half. Precise articulation, performed clearly and with musicality, is a skill that can take you to the very top of your section.
We all start out learning about slurs and staccatos in our first year of band. That extends into tenutos, accents and combined slurs and staccatos over the next few years.
Ok, if it is something that we all learn, and all know how to do, why does articulation make that big of a difference? When it comes right down to it, good articulation can be one of the most versatile tools in your musical arsenal.
Think about it – if you have a performer who plays the same style of staccato notes in Beethoven as they play in Ravel or in Bartok, it will reveal that they do not understand how articulation can contribute to making their playing more musical, not to mention how to make the music sound more like the composer intended.
A good place to begin is to think about short notes. How short is short? If you have a staccato marking above a quarter note, does that automatically mean that you should play it as an eighth note followed by an eighth note rest?
In theory, the answer is yes. That is how we learn to define staccato notes. In reality . . . no way. Some composers write in a staccato marking, and it means that the notes are just barely separated. Others want to hear notes that are as short as possible.
One way to prepare for this is to learn ways to play short notes of many different lengths. Then you can be prepared to adapt to whatever the composer or conductor asks of you.
Let's begin with a simple rising pattern:
The first time through, I want you to tongue every note, but leave absolutely no space between each of the notes. You should be using almost as much air as if you were slurring for the same number of beats.
In the low range, you will want to use an articulation style that sounds something like “toe-toe-toe” or “doe-doe-doe” to make sure that there is more actual tone sounding, rather than the sound of your tonguing. As you climb into the upper register, be sure that your tonguing becomes very light, and that you are still connecting all of your notes. It tends to be easier to allow the air to stop between notes in the top register. You will need to use solid air support throughout.
On your second time through the above exercise, I want you to put space between each of the notes. It should sound as if it were written like you see below:
The key to playing the above pattern correctly is to make sure that you are NOT stopping the air with your tongue when you are pausing between each note. Sometimes it is difficult to tell whether or not you are stopping the air with your tongue or with your airstream, so we will try something different that we never do at any other time.
We are going to play through the main exercise once more. I want you to play it WITH spaces, but WITHOUT tonguing any of the notes. The best way to describe this action is to say that you are going to feel like an owl. You will be playing “hoo, hoo, hoo, hoo” (with one “hoo” per 8th note). You may not have played this way since you first picked up the flute as a beginner. It will feel very odd – that's ok!! The beginning and end of each note will sound less distinct, but make sure that the body of the note is still of a good quality sound. If you still hear a distinct cutoff to each note, be sure that you are keeping your throat open the entire time.
When you first begin playing without tonguing, it is likely that your abdominal muscles will get tired. That is ok, too! What it means is that you need to practice this exercise without tonguing until you are able to get through the entire thing. We are building up the same muscles that we all use when we get sick and are coughing constantly. Your stomach gets sore then, for a few days, right?
Once you play through all the way without tonguing, go to the top and add back in your tonguing at the front of each note. Be SURE that you are not cutting off the notes with your tongue, but stopping them with your airstream (just as you did when you were playing like an owl).
At this point, it is a simple matter of repeating this exercise (or any passage that contains repeating notes that are all tongued) while altering the length of your notes and the spaces between the notes. Now that you have mastered the skill of stopping the notes with your airstream rather than your tongue, variations on the length of notes are limited only by your willingness to learn them. Conductors and composers will be thrilled with your new versatility!
Not only will this skill help make your short notes sound better, but you will be able to cut off long notes in a much more delicate manner than many performers. Just concentrate on ending the note without using your tongue or the back of your throat, but just stopping your airstream with your abdominal muscles.